Tuesday, February 16, 2016

Family Winter Campfire Program

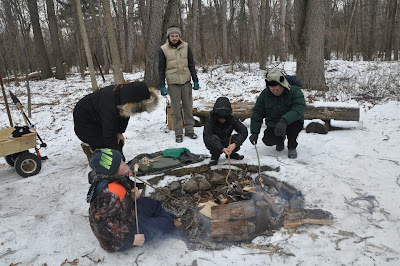
This last weekend we had our Family Winter Campfire program.  Despite some rather brisk wind chills, it was a good time, thanks to a toasty warm fire.

We started the program with learning how to build a fire.  The family had some good skills, but without enough fine tinder, their flames soon died.  We finally succeeded in getting a good fire going, thanks to some very dry wood from our sugarshack and the splitting axe one of our volunteers donated to us.


Once we got some coals glowing, we made appetizers:  dough on a stick.  To make these tasty delights, you get a tube of Pillsbury French Bread dough, break of a blob, roll it out like a snake, and then wrap it around a green stick.  Then you slowly rotate it over some nice hot coals until it is a golden brown and puffy.  When it cools, you eat.  Mmmm!


Next we had to prepare our foil dinners.  It was gourmet:  sweet potatoes, carrots, red potatoes, red sweet pepper, onions, and chicken.  You put a couple cubes of butter onto some heavy duty foil, add your ingredients, then fold and seal up your foil packet.


Place your packet in the hot coals and keep an eye on it.  You want to leave it on long enough to cook, but not so long that it burns.  We nailed it this time - about 20 minutes!  And oh, it tasted sooooo good!


The meal wrapped up with that classic campfire dessert:  s'mores. 

All told, the program was a success!  We're just sorry we didn't have a few more folks out there with us.  If you'd like join us for a toasty and tasty campfire program in the future, please let us know!
Soapstone Carving Class

Back in December, we were very lucky to have John Hoskins back to teach another soapstone carving class.  John's schedule is so busy that successfully getting him onto our calendar practically requires an act of congress, we were just thrilled to have him back.

John is a fabulous soapstone artist, as you can see by just these two carvings:


Since this was he second time out here, we changed up his class just a little bit.  Usually when he teaches, he has everyone carve a loon.  It teaches are the basic skills and techniques, and leaves you with a piece that looks like a pro did it. 


This time, however,  he also had Inuksuks as an option for the carvers, since we had a few carvers sign up who had already made loons.  The Inuksuk is an Inuit art form, essentially a pile of stones that look like a human figure.  They were originally used to mark caches or trails for hunters to follow.  Ours were much smaller and were made from a single piece of soapstone.


Soapstone is very soft, and once the rough shape is carved out with a saw, one uses rasps and files to "carve" out the details.  Dental picks work really well for fine details.


After you get your carving to where you want it (with the Inuksuks, we wanted to make it look like rough, carved stones stacked one on top of another), you start the sanding process.  Keeping your stone and sandpaper wet, you sand away, gradually working your way from 200 grade sandpaper to 800 grade.


After you get it as smooth as you want it, you are ready for the final steps:  heating it up (toaster oven or blow torch) and then applying beeswax.  This seals the stone, 


and then you buff it to a great shine.


 Interested in doing some soapstone carving?  Let us know, and we will try to schedule John again.

Thanks, John, for your time and expertise!